



the Chronograph Clock Kit
The 120 piece Chronograph steampunk clock KIT is here! Following the
popularity of my other kits, I received many requests for a new one. Whilst
making the previous batch of ready made Chronographs, I so enjoyed gluing the
laser engraved numbers onto the hour display dial, I realised it would make a
really good kit.


- See All Machines
- Automaton Head Kit
- Steampunk Truck Cab
- Motorised Gauge Kit
- Heraldic Clarion
- Nempnett Thrubwell Kit
- Chronograph
- Chronograph Kit
- Reciprocating Chronometer Kit
- Barometric Prognosticator III
- Chronological Engine
- Climatic Revelator
- Gregorian Scribulator
- Is It Time For Tea?
- Luminescent Epizoescope
- Barometric Prognosticator II
- Barometric Prognosticator I
- Singing Automaton & Ukulele Machine






I didn't want to lose any of the intricate
beauty of the ready made Chronograph;
quite a challenge considering the need for
it to be constructed without requiring any
specialist equipment or knowledge. Hence
the two months it has taken to develop the
kit and video instructions. Because I
wanted each ready made Chronograph to
be really special, I decided to individually
number each one. It would have been far
easier not to number the kits, but it seemed
only fair especially now that people will
be proudly making their own.
The Chronograph kit contains all 120 of the parts, components
and fixings necessary to construct your own working
steampunk wall or mantle clock (choice in the options). The
components, such as the quartz pendulum clock movement are
high quality, as are all the parts I make from scratch. They are
laser cut from acrylic (perspex) with many then accurately
machined and tapped with threads to ensure no specialist
equipment is required. The 54 fixings include an exciting range
of items from stainless steel rivets to solid brass machine
screws. All the numbers, labels and minute dial are laser
engraved from high quality laser engraving laminate. I've also
included beeswax wood stain to enable you to achieve a really
beautifully finished wooden plaque.
There are six instruction videos which lead you step by step
through each part of the assembly process. I developed this
style of instructional video for the Nempnett Thrubwell, which
has been successfully constructed by dozens of people. You can
view the instructions below.
Whilst the instructions suggest using cans of spray paint and
particular colours, you have the final choice if you wish to
personalise your Chronograph. In addition to paint, the only
equipment required is a pair of pliers, a screwdriver and
possibly some wire cutters. I'd suggest sticking the wooden
plaque together with PVA wood glue and the plastic parts with
super glue, although it would be possible to use suitable
alternatives.
• When hung on a wall, the completed Chronograph is 23cm
wide by 28cm high by 6cm deep.
• If free standing, using the optional wooden stand, it's 29cm
wide by 31cm high by 10cm deep.
• Each plaque has its own individually engraved number.
• Minutes are read off the right hand dial while the left hand
gear indicates hours.
• The Chronograph is very accurate as it employs a quartz
clock movement.
• The clock movement requires a single AA battery.
Instructions
Whilst the kit provides all 120 parts
required to build your Chronograph clock,
you’ll also require some lint free cloth to
clean the laser engravings, and a solvent
such as white spirit, which is also known
as mineral spirits, or mineral turpentine,
or turpentine. Alternatively you could use
Methylated Spirits, which is also known
as denatured alcohol, or wood spirit or
denatured rectified spirit.
I’d also recommend using PVA wood glue
to assemble the wooden base and thin
(runny) Super Glue to stick the other
components together. You could always
use appropriate alternatives.
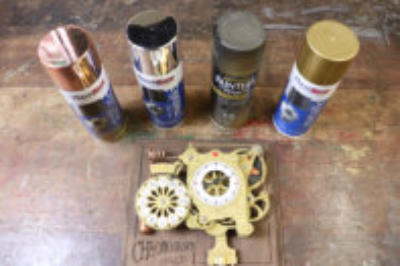
You’ll also require paint. I’d suggest spray
cans of metallic copper, metallic silver,
matt black and metallic brass. Although
you can obviously choose your own
colours.
To fix everything together, you’ll require
a flat bladed screwdriver, a pair of pliers
and a pair of side cutters.
Beeswax wood polish is also included to allow you to achieve a beautifully polished plaque.
Click here for health and safety information.
Instruction videos


1. Cleaning Engravings
2. Assembling the Base
3. Gluing Components Together
4. Preparing and Painting Parts
5. Assembling Painted Parts
6. Final Assembly


7. Assembling the Optional Stand





- Home
- Intriguing Machines
- Automaton Head Kit
- Steampunk Truck Cab
- Motorised Gauge Kit
- Heraldic Clarion
- Nempnett Thrubwell Kit
- Chronograph
- Chronograph Kit
- Reciprocating Chronometer Kit
- Barometric Prognosticator III
- Chronological Engine
- Climatic Revelator
- Gregorian Scribulator
- Is It Time For Tea?
- Luminescent Epizoescope
- Barometric Prognosticator II
- Barometric Prognosticator I
- Connecting Machines
- Singing Automaton & Ukulele Machine
- Other Products
- Online Shop
- News & Events
- About
Chronograph Kit


The 120 piece Chronograph steampunk clock KIT is here!
Following the popularity of my other kits, I received many
requests for a new one. Whilst making the previous batch
of ready made Chronographs, I so enjoyed gluing the laser
engraved numbers onto the hour display dial, I realised it
would make a really good kit.
I didn't want to lose any of the
intricate beauty of the ready
made Chronograph; quite a
challenge considering the need
for it to be constructed without
requiring any specialist
equipment or knowledge.
Hence the two months it has
taken to develop the kit and
video instructions. Because I
wanted each ready made
Chronograph to be really
special, I decided to
individually number each one.
It would have been far easier
not to number the kits, but it
seemed only fair especially now
that people will be proudly
making their own.
The Chronograph kit contains all 120 of the parts,
components and fixings necessary to construct your own
working steampunk wall or mantle clock (choice in the
options). The components, such as the quartz pendulum
clock movement are high quality, as are all the parts I make
from scratch. They are laser cut from acrylic (perspex) with
many then accurately machined and tapped with threads to
ensure no specialist equipment is required. The 54 fixings
include an exciting range of items from stainless steel
rivets to solid brass machine screws. All the numbers,
labels and minute dial are laser engraved from high quality
laser engraving laminate. I've
also included beeswax wood
stain to enable you to achieve a
really beautifully finished
wooden plaque.
There are six instruction videos
which lead you step by step
through each part of the
assembly process. I developed
this style of instructional video
for the Nempnett Thrubwell,
which has been successfully
constructed by dozens of
people. You can view the
instructions below.
Whilst the instructions suggest
using cans of spray paint and
particular colours, you have
the final choice if you wish to
personalise your Chronograph.
In addition to paint, the only
equipment required is a pair of
pliers, a screwdriver and
possibly some wire cutters. I'd
suggest sticking the wooden
plaque together with PVA
wood glue and the plastic parts
with super glue, although it
would be possible to use
suitable alternatives.
• When hung on a wall, the completed Chronograph is
23cm wide by 28cm high by 6cm deep.
• If free standing, using the optional wooden stand, it's
29cm wide by 31cm high by 10cm deep.
• Each plaque has its own individually engraved number.
• Minutes are read off the right hand dial while the left
hand gear indicates hours.
• The Chronograph is very accurate as it employs a quartz
clock movement.
• The clock movement requires a single AA battery.
Instructions
Whilst the kit provides all 120
parts required to build your
Chronograph clock, you’ll also
require some lint free cloth to
clean the laser engravings, and
a solvent such as white spirit,
which is also known as mineral
spirits, or mineral turpentine, or
turpentine. Alternatively you
could use Methylated Spirits,
which is also known as
denatured alcohol, or wood
spirit or denatured rectified
spirit.
I’d also recommend using PVA
wood glue to assemble the
wooden base and thin (runny)
Super Glue to stick the other
components together. You
could always use appropriate
alternatives.
You’ll also require paint. I’d
suggest spray cans of metallic
copper, metallic silver, matt
black and metallic brass.
Although you can obviously
choose your own colours.
To fix everything together,
you’ll require a flat bladed
screwdriver, a pair of pliers and
a pair of side cutters.
Beeswax wood polish is also
included to allow you to
achieve a beautifully polished
plaque. Click here for health
and safety information
Instruction Videos




1. Cleaning Engravings
2. Assembling the Base
3. Gluing Components
4. Preparing and Painting
5. Assembling Parts
6. Final Assembly


7. Assembling the Optional Stand
